Pi-hole on Raspberry Pi Lab:
Deploying with Docker & Portainer, then Using Pi-hole Daily
Why Pi-hole?
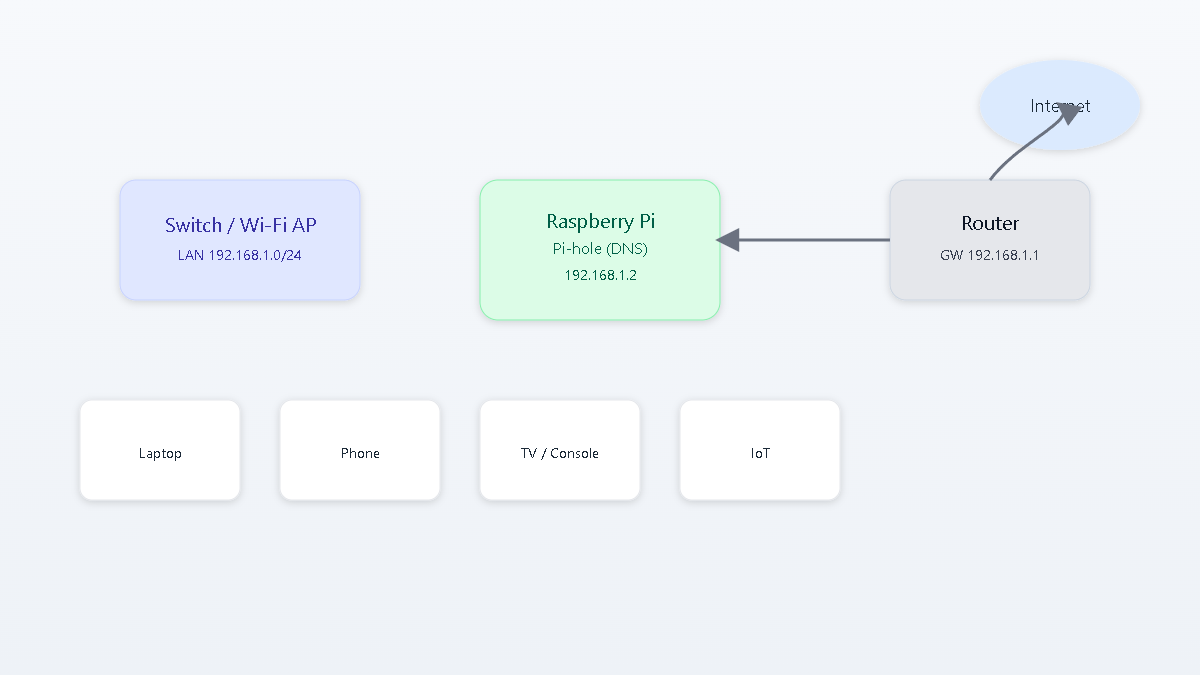
Pi-hole acts as a network-wide DNS sinkhole that blocks ads, trackers, and malicious domains before they reach client devices. I built a hands-on lab on a Raspberry Pi using Docker and Portainer to learn deployment and daily operations end-to-end.
Lab Setup Overview
- Hardware: Raspberry Pi 4, microSD (16 GB+), reliable power, Ethernet to home LAN.
- Network plan: Reserve a static IP for the Pi (e.g.,
192.168.1.2); Pi-hole will query DNS requests. - Software: Raspberry Pi OS Lite (64-bit recommended), Docker Engine, Portainer CE, Pi-hole container.
Install OS, Docker, and Portainer
1) Raspberry Pi OS
- Flash Raspberry Pi OS Lite to microSD (Raspberry Pi Imager).
- Boot, SSH in (
ssh pi@raspberrypi.local), then update:sudo apt update && sudo apt full-upgrade -y. - Set a static IP via router.
2) Install Docker Engine
# Install Docker on Raspberry Pi OS
curl -fsSL https://get.docker.com | sh
sudo usermod -aG docker $USER
# Log out/in or reboot to apply group membership
3) Install Portainer CE
sudo docker volume create portainer_data
sudo docker run -d \
  -p 8000:8000 -p 9443:9443 \
  --name portainer \
  --restart=always \
  -v /var/run/docker.sock:/var/run/docker.sock \
  -v portainer_data:/data \
  portainer/portainer-ce:latest
# Browse to https://<pi-ip>:9443 to set admin password and add the local Docker environment
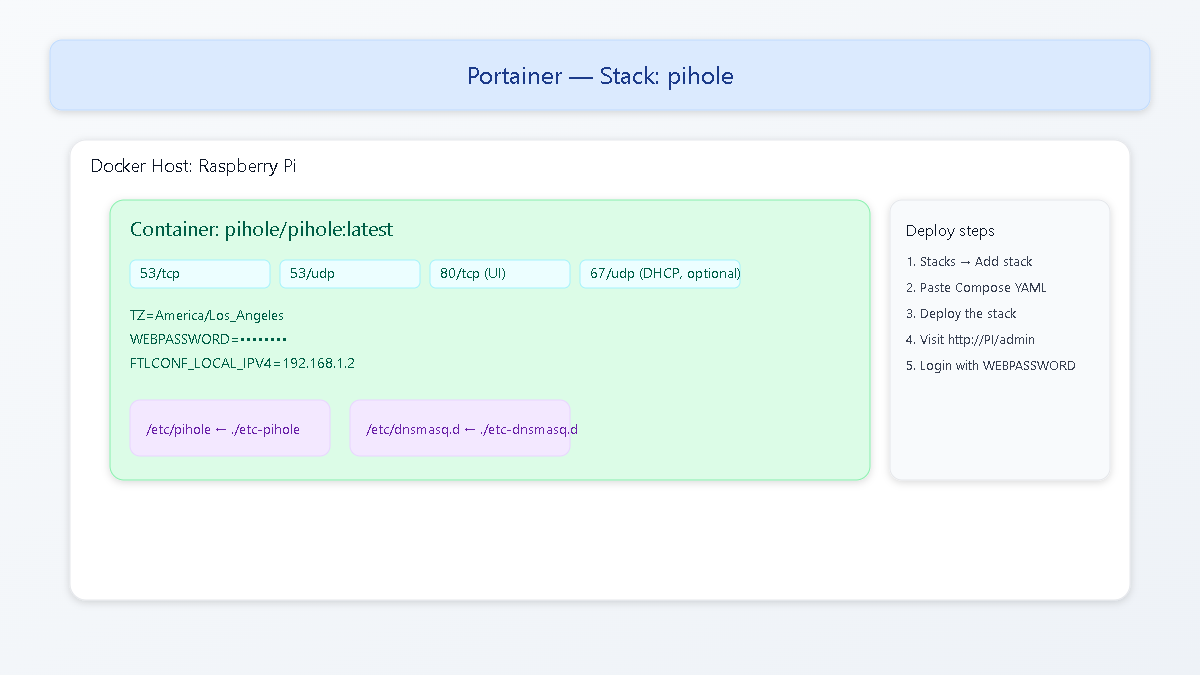
Deploy Pi-hole via Portainer
In Portainer, I prefer a Stack (Compose) for tidy volumes and repeatability.
# portainer stack: pihole
version: "3.8"
services:
  pihole:
    container_name: pihole
    image: pihole/pihole:latest
    ports:
      - "53:53/tcp"
      - "53:53/udp"
      - "80:80/tcp"      # admin UI
      # - "67:67/udp"    # enable if you will use Pi-hole as DHCP server
    environment:
      TZ: "America/Los_Angeles"
      WEBPASSWORD: "CHANGE_ME_SECURELY"
      FTLCONF_LOCAL_IPV4: "192.168.1.2"   # Pi's LAN IP
    volumes:
      - ./etc-pihole:/etc/pihole
      - ./etc-dnsmasq.d:/etc/dnsmasq.d
    cap_add:
      - NET_ADMIN        # required if using DHCP
    restart: unless-stopped
- Portainer → Stacks → Add stack, paste the YAML, then Deploy the stack.
- Browse to
http://<pi-ip>/adminand log in with yourWEBPASSWORD.
Note: Ensure nothing else on the Pi is using port 53. On Raspberry Pi OS this is typically free; if not, stop any conflicting resolver.
Point Your Network/Devices to Pi-hole
- Router-level (recommended): Set primary DNS to the Pi-hole IP (
192.168.1.2). Keep a secondary upstream only if your router won’t force clients to use the primary (to avoid bypassing). - Per-device: On a test laptop/phone, set DNS to the Pi-hole IP to validate before changing the whole network.
Using Pi-hole Day to Day
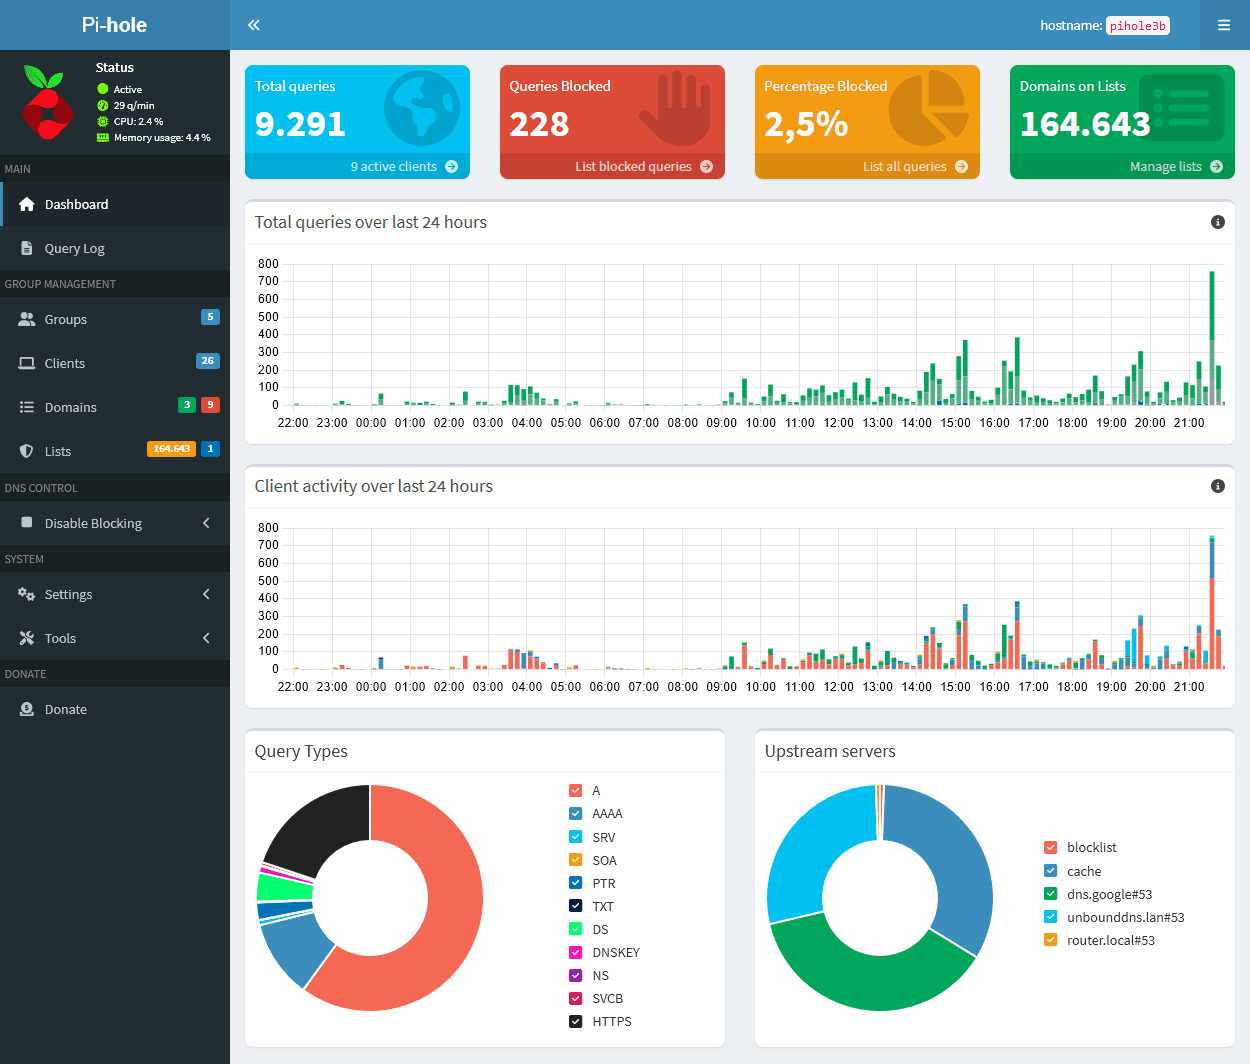
Dashboard
The dashboard summarizes total queries, blocked domains, top permitted/blocked clients, and upstream response times. I verify activity immediately after pointing a test device to Pi-hole.
Query Log: Investigate & Act
- Open Query Log, filter by client or domain to see live lookups.
- Click a domain to allow or block it instantly. Use this for rapid testing when a site/app breaks.
- Patterns of telemetry/ads become candidates for permanent blocklists or regex rules.
Allow/Block: Whitelist & Blacklist
- Whitelist (Allowlist): Add domains that must always resolve (e.g., a SaaS auth endpoint).
- Blacklist (Denylist): Add domains you always want blocked (e.g., aggressive trackers).
- Use comments when adding entries to document the reason and owner.
Blocklists (Adlists) & Gravity
- Under Group Management → Adlists, add curated lists (e.g., community-maintained). Avoid piling on too many; quality beats quantity.
- Run Tools → Update Gravity after changing lists to rebuild the blocking database.
- Periodically review Top Blocked Domains to prune noisy or conflicting lists.
Per-Client Rules & Groups
- Create groups like Default, Kids, IoT.
- Assign clients by IP/MAC and map groups to specific adlists, blocklists, or regexes.
- Example: stricter rules for Kids, looser for Work, and a minimal set for IoT.
DHCP (Optional)
If your router’s DNS settings are limited, enabling Pi-hole’s DHCP server ensures every client uses Pi-hole. Steps:
- In Pi-hole, go to Settings → DHCP, enable DHCP, set the correct range (e.g.,
192.168.1.50–192.168.1.200), and the router/gateway IP. - Recreate the container with UDP 67 exposed (see Compose comment) and
NET_ADMINcapability.
Conditional Forwarding (Local Hostnames)
To resolve local device names (e.g., nas.local.lan), enable Settings → DNS → Conditional forwarding and point to your router’s IP and local domain (if set).
Upstream DNS & Privacy
- Under Settings → DNS, choose upstream providers (e.g., Cloudflare, Quad9) and enable DNSSEC if supported.
- For maximum privacy, you can add a local recursive resolver (e.g., Unbound) later and point Pi-hole to it.
Backup & Maintenance
- Use Settings → Teleporter to export/import configuration (adlists, groups, domains, clients).
- Keep the container updated: pull the latest image and redeploy the stack; volumes preserve your settings.
- Check Tools → Tail pihole-FTL.log for troubleshooting DNS behavior.